Your shopping cart is currently empty. Need help finding the right part? Just contact us!
Fitment Notes:
There are many variables and inconsistencies from Z to Z, even from the factory. With most early Z-Cars, no trimming should be needed. We provided extra material on parts of the outer edges, allowing a custom fit for your Z. Some factors to consider: Quarter Panels are not always consistent in mounting position. Even the tail light area can have variances. Carpeting is even more of a variable, depending on whether you have old or newer carpet, its condition, the thickness of the Jute padding used, etc. For instance, if you use an aftermarket rear deck mat, many will be too thick for the Speaker Panel to have proper clearance without some trimming. Many of you will also choose to add rubber trim/weatherstrip around their panel (available from many places with differing thickness, appearance, colors, etc.), which will vary depending on the clearance you have, the look and function you desire, and type of weatherstrip/trim you choose. We suggest mocking it all up the way you want it, including trim if you desire, before anything is bonded or drilled. For example, on the early Z at the shop (the one pictured on the product page), there would be no need for trimming. However, on another early Z, belonging to one of our team members, the quarter panels are definitely "pushed out farther" so that they are too tight against the speaker panel, so slight trimming would be necessary on the extreme outside edges of the panel for best fitment.
Installation Notes:
Another one of the benefits of Fiberglass is that there are many ways to install a Panel like this one, and some of them won’t even require drilling (see “Non-Drilling Options” below). This specially-fitted Speaker Panel does include installation hardware, but you’re certainly not limited to our suggested installation. The most likely ways for simple and secure installation are using the factory mounting brackets for the rear panel. How you mount the panel to those brackets is up to individual taste. Whether you are using these brackets, or some way of modifying the carpeting, or using a combination of mounting points, some of the ways this panel can be installed are:
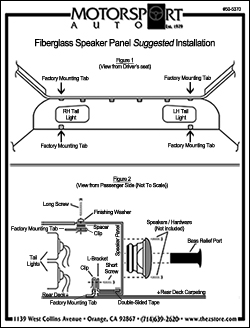
- Brackets, rubber spacers, screws & screw clips (our kit and suggestion, see diagram below)
- Double-sided automotive tape or gel adhesives (for instance: to hold brackets to the panel)
- Functional Hinges (for custom/quicker access to the tail lights)
- Direct attachment with screws (drilling holes into the fiberglass or body)
- Partial (bottom) attachment with Velcro (if you have a loop style carpet)
- Attachment with various other types of brackets/clips
- Attachment with plastic rivets or screws
- Attachment with Adhesive Mounting Pads or Buttons
- Various combinations of the above, with or without rubber trim around outer edges
Non-Drilling Options:
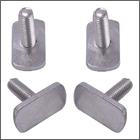
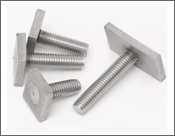
Don’t want to drill any holes in your Speaker Panel? Adhesives and double-sided tape can be used in conjunction with the available brackets your Z already has. The bottom L-brackets can be bonded on to the panel. For the top brackets, you can find various versions of what are often referred to as “T-Bolts” (see examples below), and bond them to the underside of the panel (above the factory bracket), and attach them with a nut and washer (with rubber spacer). Note: As far as attaching your choice of speakers to the panel, doing so without drilling mounting holes would require much customization and custom hardware.
Basic Installation Guide:
The image below shows our basic suggestion for speaker panel mounting. As stated above, there are many options! This diagram may help you to decide how you will want to install your panel. Click on the image below for a larger PDF version.
Included Basic Suggested Installation Kit:
Our simple suggested installation kit includes the following:
- Two Mounting "L" Brackets
- Two Long (upper) Screws
- Two Short (lower) Screws
- Four Screw Spring Clips
- Two Rubber Spacers (most likely height)
- Two Tall Rubber Spacers (can be trimmed to fit if standard height spacers are too short)
- Two Finishing Washers
- Double-Sided Foam Tape
If you have any questions about the various installation options, our basic suggested kit, or the panel itself, please contact us.